SGS Report allows the grouping, sorting or filtering of Report Lists.
Applying a Grouping
Either:
| • | drag a Column title to the Grouping Area (green arrows indicate where the heading may be dropped into place); or |
| • | insert a new field name in the Grouping Area: |
| i. | Right-click in the Data Area. |
| ii. | Select Edit Displayed Data from the subsequent menu. |
| iii. | Drag the appropriate field name from the Customization box to the required point in the Grouping Area and release the mouse button. |
| iv. | Repeat if required, and then close the Customization box (click the cross in the top right-hand corner) to refresh the view of the data. (NOTE: The data refresh may take up to a minute to complete depending on the quantity of data affected. Do NOT attempt to re-close the Customization box whilst the data refresh is in progress). |
Once a Grouping has been applied, a sort or filter may be applied to the Grouped data.
Removing a Grouping
If a filter has been applied to a Grouping, the filter must be cleared before the Grouping is removed. To do this:
| 1. | Click the down arrow on the required field. |
| 2. | Select the "(All)" option from the subsequent listing. |
Now remove the Grouping:
| 3. | Right-click in the Grouping Area and select Edit Displayed Data from the subsequent menu. |
| 4. | Drag the required field name to the Customization box and release the mouse button. (NOTE: If the filter has not been removed before the grouping option is undone, then a filtered view of the data will continue to be presented). |
| 5. | Repeat steps 1-4 as required. |
| 6. | Close the Customization box (click the cross in the top right-hand corner) to refresh the view of the data. (NOTE: If Prime is exited before the refresh has taken place, the filter will be retained by Prime for future use). |
| Sorting | Report Lists |
Report Lists may be sorted either alphanumerically (the default setting) or reverse alphanumerically once a Grouping has been applied.
To apply a sort, click on the title of the field against which the sort is to be applied. The Report Listing will automatically refresh to reflect the sort.
Filtering Report Lists
In addition to the Setup Filter, separate filters may be applied to the field titles on a displayed report listing in order to restrict the view to display only those items which meet the filter criteria.
Applying a Filter
| 1. | If necessary, add a field names to the Report Listing: |
| i. | Right-click in the Data Area. |
| ii. | Select Edit Displayed Data from the subsequent menu. |
| iii. | Drag the appropriate field name from the Customization box to the required point on the screen and release the mouse button. |
| iv. | Repeat if required, and then close the Customization box (click the cross in the top right-hand corner) to refresh the view of the data. |
| 2. | Click the down arrow on any of the field names and select the required filter type: |
| • | (All) – displays all data (and therefore removes any previously applied filters). |
| • | (Custom) – allows complex filtering across a range of criteria (see the Custom Filters section for more information). |
| • | (Blanks) – displays all items which have a blank value in the currently selected heading. |
| • | (NonBlanks) – displays all items which do NOT have a blank value in the currently selected heading. |
The down arrow will change colour to indicate that a filter has been applied. Once a filter is applied, a Customize bar will appear at the foot of the Data Area.
Removing a Filter
To remove a filter, either:
| 1. | Click the down arrow on the required field. |
| 2. | Select the "(All)" option from the subsequent listing. |
(NOTE: If filters have been applied to more than one field, repeat the above steps to remove the filters on each field); or
| 1. | Click the cross on the Customize bar. (NOTE: This will clear all filter criteria currently applied). |
Custom Filters and the Customize Bar
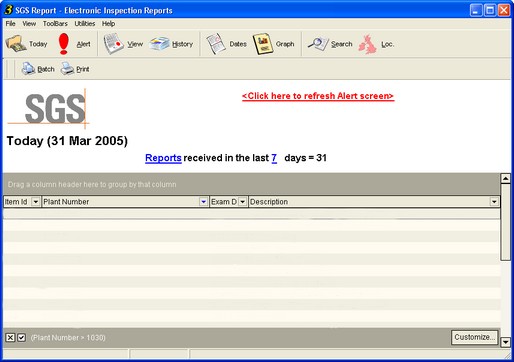
The Customize Bar appears at the foot of the Data Area when any filter is applied. The current filter will appear at the left-hand end of the Customize Bar.
| • | To delete the current filter, click the "X". This will clear all filter criteria from the current view. Deleting the filter will also close the Customize Bar. |
| • | To disenable the filter, click the tick. The filter can be re-applied by re-clicking the in the tick box. |
Custom Filters
More complex filters may be created using the "Custom" option:
| 1. | Click the down arrow on the heading to which the main filter is to be applied, and choose "(Custom )". |
| 2. | A Custom Filter dialog box will open: |
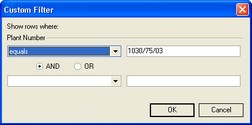
| 3. | Complete the lines of the filter as required, and click OK to apply. The filter will remain in force until it is removed. |