The Report Listing offers a number of options. Right-click in the Data Area to view the options menu:
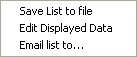
Save List to file
To save the currently displayed report listing:
| 1. | Right-click in the Data Area of the screen. |
| 2. | Select "Save As..." from the subsequent menu. |
| 3. | Navigate to the location in which the file is to be saved, select the appropriate file type from the drop-down list and set a filename. |
| 4. | Click Save. |
Edit Displayed Data
Edit Displayed Data allows the customisation of information presented on the report listing.
To add fields to a view:
| 1. | Right-click in the Data Area. |
| 2. | Select "Edit Displayed Data" from the subsequent menu. |
| 3. | The Customization box will open: |
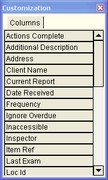
| 4. | Drag the required field name from the Customization box to the header bar on the report list. |
| 5. | Repeat as required and then close the Customization box (click the cross in the top right-hand corner) to refresh the view of the data. |
To remove fields from a view:
| 1. | Right-click in the Data Area. |
| 2. | Select "Edit Displayed Data" from the subsequent menu. |
| 3. | The Customization box will open. Drag the field name to be removed away from its position. As soon as a cross appears on the field name, release the mouse key. The field will be removed from the screen and will instead be listed in the Customization box. |
| 4. | Repeat as required and then close the Customization box (click the cross in the top right-hand corner) to refresh the view of the data. |
Email list to...
To email the currently displayed report listing:
| 1. | Right-click in the Data Area. |
| 2. | Select "Email list to..." from the subsequent menu. |
| 3. | Input the email address of the recipient(s) in the blank email which opens. |
| 4. | Add a subject line and any necessary message. |
| 5. | Click Send Message. The report listing will be sent as an attachment to the email. |
View a selected report
To view a report displayed on the listing either:
| • | double-click on the required report, or |
| • | click on the required report and select |
Email the current/viewed report
| 1. | Right-click in the Data Area of the report. |
| 2. | Select "e-mail report to..." from the subsequent menu. |
| 3. | Input the email address of the recipient(s) in the blank email which opens. |
| 4. | Add a subject line and any necessary message. |
| 5. | Click Send Message. The report will be sent as an attachment to the email. |
Email multiple reports
To email multiple reports, the Send email with Outlook option must first have been enabled.
| 1. | Select the required reports: |
| • | To select reports distributed throughout the listing, select the first report and then hold down the Control key and click on the other required reports. (NOTE: Selected reports will be highlighted in blue). |
| • | To select reports adjacent to one another, click on the first report, hold down the Shift key and select the last report of the group. (NOTE: Selected reports will be highlighted in blue). |
| 2. | Click the |
| 3. | Input the email address of the recipient(s) in the blank email which opens. |
| 4. | Add a subject line and any necessary message. |
| 5. | Click Send. The reports will be sent as attachments to the email. |
Save the current/viewed report
| 1. | Right-click in the Data Area of the report. |
| 2. | Select "Save As..." from the subsequent menu. |
| 3. | Navigate to the location in which the file is to be saved, select the appropriate file type from the drop-down list and set a filename. |
| 4. | Click Save. |
Printing reports
Individual reports
To print a copy of the report currently displayed:
| 1. | Either: |
| • | Select File > Print from the Menu Bar, or |
| • | Click the |
| 2. | The standard Windows print control box will then open offering a choice of printer. Make any necessary changes and click OK to print. |
NOTE: If the selected report is too large to fit on a single sheet of paper, a page break will automatically be inserted at an appropriate point.
Multiple reports
To print a copy of multiple reports:
| 1. | Select the required reports: |
| • | To select reports distributed throughout the listing, select the first report and then hold down the Control key and click on the other required reports. (NOTE: Selected reports will be highlighted in blue). |
| • | To select reports adjacent to one another, click on the first report, hold down the Shift key and select the last report of the group. (NOTE: Selected reports will be highlighted in blue). |
| 2. | Click the |
| 3. | The standard Windows print control box will then open offering a choice of printer. Make any necessary changes and click OK to print. |
NOTE: If any of the selected reports are too large to fit on a single sheet of paper, a page break will automatically be inserted at an appropriate point.
Printing report lists
To print the currently displayed report listing:
| 1. | Select File > Print from the Menu Bar. |
| 2. | The standard Windows print control box will then open offering a choice of printer. Make any necessary changes and click OK to print. |